Replacing Air filters on the C6 S6

So the new K&N air filters arrived yesterday and I went through the Bentley manual and replaced the Air filter on the drivers side. I am about to attempt to replace the air filter on the passenger side and had the following questions.

  1. Would it be bad to drive the car with one new air filter and an older air filter on the other side for a couple of days ( This is purely a logistical question since this would allow me to just change this side over the weekend).

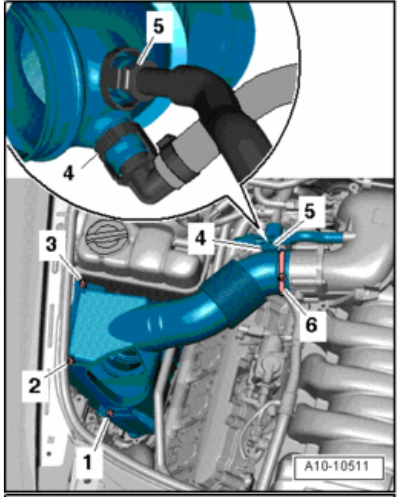
  2. According to the manual I need to separate the vacuum lines from the upper air filter housing. How does one separate the vacuum lines? Do i just tug on these or is there a procedure to separate these correctly? Also is there any caution needed while assembling this back.

vaccumlines

Not horrible, but not recommended. Changing the filters is pretty quick once you understand what you’re looking at.

To separate the external lines, all you have to do is pinch the retainer, wiggle and pull. The boot slides off the intake horn and then it’s just the screws shown.

Thanks for the information, in the end was as simple as you described it, I however ended up breaking a piece off the retainer, however while putting this back in I could hear the click from the remainder of the retainer, so I assume this will hold till the next air filter change. Couple of follow up questions

  1. while putting back the passenger side air intake there is a collapsible bracket which connects the air duct which mounts to the front bumper and the air filter housing, this bracket clicked into the air filter housing fine but doesn’t seem to sit flush with the air duct, I assumed this wouldn’t really affect functionality adversely however I am wondering if it is advisable to just replace this part, possibly it is worn out.

  2. How often should one replace or clean the air filters? I was told every other oil change. Is this a good rule to live by?

  3. It turns out the previous owner had a pretty decent set of K&N air filters that can be just cleaned, How do folks clean it, do you use the K&N air filter recharge kit?

Hi super.

Here are a few too late for the project but perhaps helpful tips.

  1. When doing the air filter service, try to do this after a longer drive or when the engine bay is warm.
    Having warm hoses tends to help reduce breakage and usually ends with better results, less fighting with the clips.

  2. It is also a good time to remove and inspect the plastic lines and inspect them. Many times there will be small cracks that can cause bigger issues down the line. Such things as misfires and fuel related codes.

As for changing the filters. You don’t need to change the filters every oil change but definitely inspect them and the air boxes for debris. If the air filters look in poor condition then I would always bias on the side of replacement.

When it comes to cleaning the K&N filters. I would follow their instructions. But to give a quick run down. You can take them and clean them with soap and water. Light soap and water. It’s important to remember that the filter material on K&N filters lets a large amount of air pass by them, this is what helps the motor breath better.

It’s the oil itself that aids in making the filters perform better in the filtration department. Do don’t be shy with the oil but then again don’t over do it. We have mas air meters on our cars and they don’t like oil on them.

What I do is, clean the filters until I don’t see any more red oil on them. Let the filters dry over night and then add K&N oil back over the filters until the red color comes back to the filter. I wait for the oil to set in and then add more as needed.
Thanks for the great advice Count, getting the plastic nice and warm before doing this makes great sense.I went ahead and ordered the K&N cleaning kit.

Air filters done, next I am aiming for a carbon cleaning\spark plug\injectors followed by valve cover gasket replacement which is clearly leaking.

Plugs and packs are always good to replicate together

Carbon clean and injectors are good to do at the same time as well

When you pull the intake off always inspect it before putting it back on. I would super recomend getting the JHM intake spacers. I can’t tell you how much they help in several aspects. Everything from keeling carbon at bay to helping make and keep more power. The make a difference well beyond the small price.

On the carbon clean. With 10 years of carbon cleaning under my belt do the chemical with the brush. The JHM kit works well if you don’t have that kind of brush

Make sure to do the valve covers last. And dont do them until you have inspected your PCV system thoroughly

I just replaced my passenger side gasket today and it looks like my leak was coming from the gasket that is between the head and the cam retainer plate. I assume that’s something to take the motor out to change.

@justincredible For the injectors. is it more cost effective to clean\repair them as opposed to replacing them? I vaguely remember someone on another thread mentioning that they got them cleaned out instead of replacing or does this sound like a bad idea.

As for the JHM spacers, definitely getting this done when opening for the carbon clean.

The more important question i have however is - What is the advantage of doing the valve covers at the end?

I will let folks smarter than me answer this but I am curious as to how you determined that the leak was from the lower gasket? visual inspection ?