Full S-Tronic and rear sport differential service (RS5)

I’m about to service all of the fluids in the S-Tronic DL501 transmission as well as the 0BF sport rear differential and ordered everything needed. Not all the fluids are in need of changing currently (I’m at 50K and change) but I’m doing so anyway as maintenance above and beyond. This thread will have a full write-up along with photos and videos as I have time to get everything edited and posted. I spent a lot of time reading and researching and feel I’ve made fluid improvements where I have enough information to make a viable determination as to what better is. Where I don’t have enough info, I’m sticking to OEM.

Some of the material is common knowledge to the regulars but I’m throwing it in here for anyone who joins the forum and doesn’t know the basics.

Let’s start out with the rear differential. The RS5’s rear differential is a “sport differential” and it’s active (I believe Audi calls this EDL). It’s shared with a number of other Audis including the S4, S5, S6 but may have programming or internal differences from other models. It’s often referred to as the OBF differential.

The differential uses two different fluids. One is a GL5 or “MTF” gear fluid, the other is an “ATF” style fluid of unknown specifications. MTF=manual transmission fluid, ATF=automatic transmission fluid. It’s an oversimplification technically but works fine for maintenance purposes. The MTF side is where the ring and pinion gear is. The ATF side controls the active differential hydraulics and clutch packs.

Here’s a video on how the rear differential works:

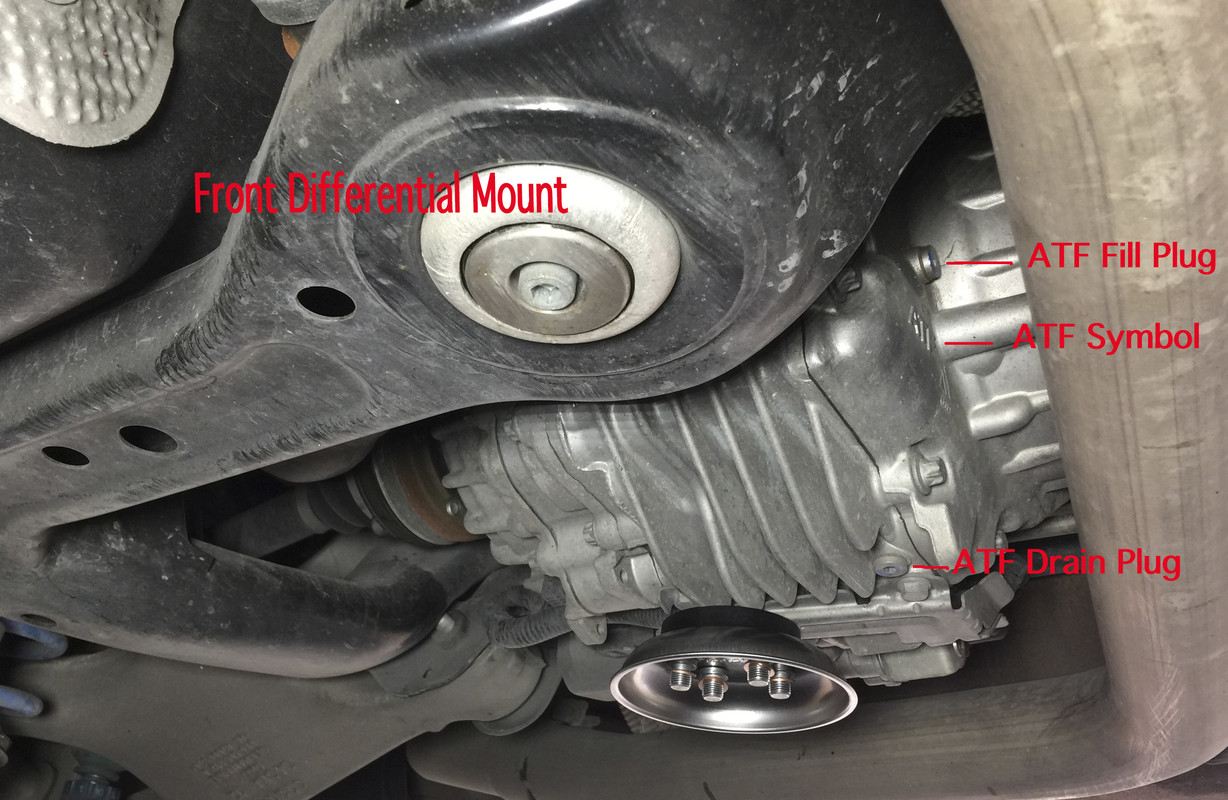
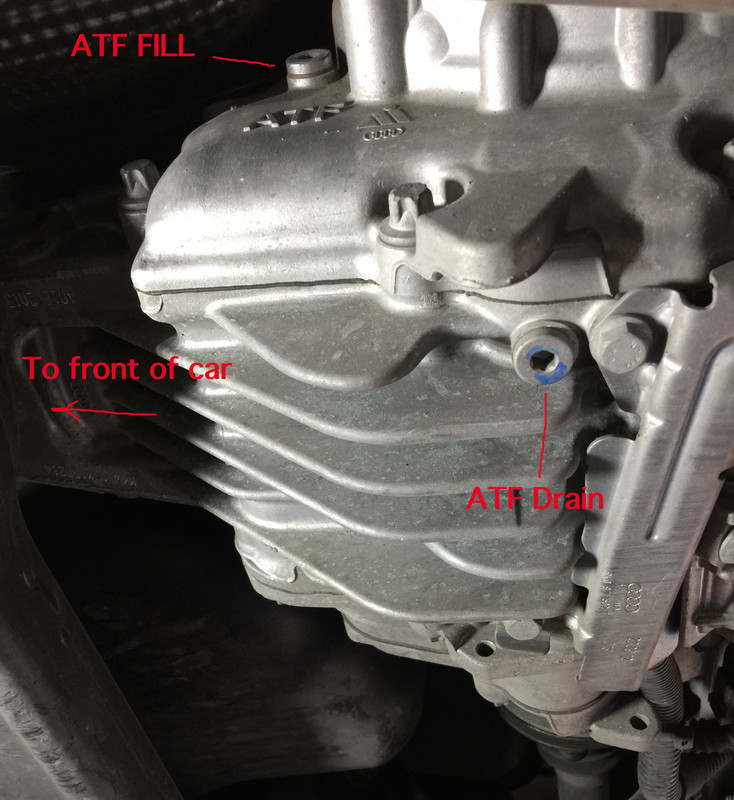
Servicing The Rear Differential

Rear Differential OEM fluid Part Numbers
VAG G 052 145 S2 “MTF” side
VAG G 055 515 A2 “ATF” side

VAG G 052 145 S2 is essentially a GL5 75w90 synthetic gear oil. I plan on substituting that fluid for Motul Gear 300 100% synthetic gear oil as it has a very high VI (222) and it’s viscosity doesn’t change as much with temperature. I’m usually up to speed on the highway before everything is fully warmed up. My engine oil temps are usually around 160 and I’ve logged transmission temperatures, in the summer, and it takes a good ten minutes at highway speed to get things up to temperature. The Motul flows well when it’s cold and states it has zero shear.

The specifications for the ATF fluid, G 055 515 A2 are unknown. I cannot find them anywhere nor any manufacturer who recommends a product they make except for Ravenol. I’ll be sticking with the OEM fluid then! It ain’t cheap, around $45 for one liter. Luckily you only need one.

Aftermarket G 055 515 A2-compatible Rear Differential ATF Fluids

Ravenol Transfer Fluid TF-0870 (meets G052515A2/055515A2)

Aftermarket G 052 145 S2 compatible Rear Differential MTF Fluids

We’re going to start with Motul as they’ve managed to make things complicated. If you go to their oil selector page and choose the RS5 MY 2010-11, they have different options from 2012-2016

MY 2010-11; https://www.motul.com/us/en-US/lubricants/recommendations/53c4e9b2c2960e9a83fdd54d46d9ac65?type_name=RS5+4.2 +FSI+quattro+%282010-2011%29

MY 2012+ ; https://www.motul.com/us/en-US/lubricants/recommendations/c1f4ff1812632044b9f2a18d4ccb91cc?type_name=RS5+4.2 +FSI+quattro+%282012-2016%29

Why, Motul why??? So they recommend the Gear 300 LS and the specs aren’t nearly as good as the non-LS (limited slip) version. Their literature even says the Gear 300 is for diffs with no limited slip. Remember, we have two chambers and the gear fluid doesn’t come in contact with the active diff components. That’s handled by the ATF side. So keep that in mind.

Motul*Gear 300 LS 75W-90 (Motul’s recommendation) SAE J 306
Colour Green Viscosity grade 75W-90 Density at 20°C (68°F)
Viscosity at 40°C (104°F) 109.6
Viscosity at 100°C (212°F) 16.4
Viscosity index 161 Flash point 200°C / 392°F Pour point -42°C / -43.6°F

MOTUL GEAR 300 75W-90 (SAE J306) Look at the viscosity @40°C! Amazing.
Viscosity grade 75w-90
Density at 20°C (68°F) 0.897
Viscosity at 40°C (104°F) 72.6 mm2/s
Viscosity at 100°C (212°F) 15.2 mm2/s
Viscosity index 222
Flash point 392°F
Pour point -60°C
*
Redline MT90
API Service Class GL 4
SAE Viscosity Grade (Gear Oil) 75W90
SAE Viscosity Grade (Motor Oil) 15W40
Vis @ 100°C, CSt 15.5
Vis @ 40°C, CSt 86.2
Viscosity Index 194
Pour Point, °C -45
Pour Point, °F -49
*
Amsoil SAE 75W-90 Gear Lube (G052145S2 Cert)
Kinematic Viscosity @ 100°C,16.6
Kinematic Viscosity @ 40°C, 129.7
Viscosity Index 137
Brook eldViscosity,cP(ASTMD2983) 98,300@-40°C
Flash Point, °C (°F) (ASTM D92) 214 (417)
PourPoint,°C(°F)(ASTMD97) -51(-60)

Ravenol VSG SAE 75W-90 (G052145S2 Cert)
Density at 20°C* kg/m³*** 864********
Viscosity at 100°C 16,5**
Viscosity at 40°C 96,8****
Viscosity index VI 185
Brookfield Viscosity 40.500
Pourpoint°C -57*
Flash point (COC) 226°C 438°F
*
Liqui-Moly Gear Oil SAE 75W-90 GL4+ (G052145S2 Cert)
SAE class (gear oils)75W-90 SAE J306
Density at 15 °C 0,855 g/cm3
Viscosity at 40 °C 81,5
Viscosity at 100 °C 14,3
Viscosity at -40°C (Brook- field)<= 150000 mPas ASTM D 2983-09
Viscosity index 183
Pour point -60 °C
Flash point200 °C
*
Fuchs Titan Sintopoid SAE 75W-90
No specs yet…

Rear Differential Parts list
-G 052 145 S2 (1 Liter needed) Can substitute with another approved oil that meets specs.
-G 055 515 A2 (1 Liter needed) Stick to OEM fluid $45 approx.
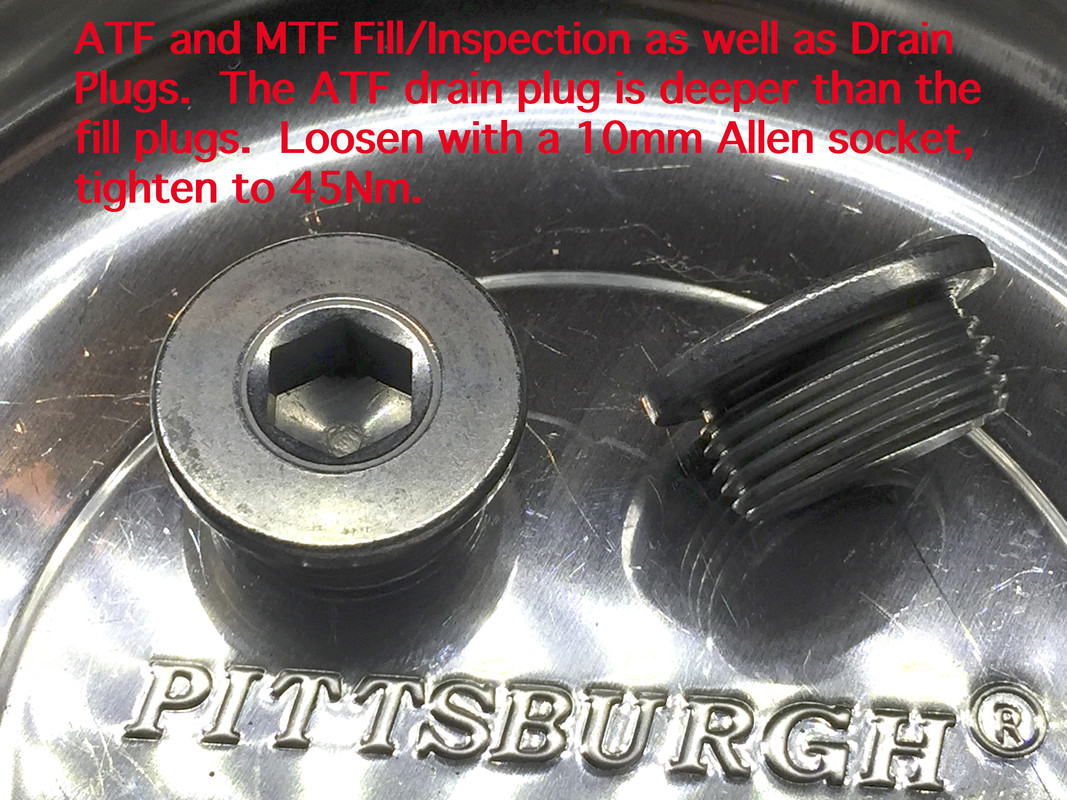
(4)Fill/drain plugs with integrated washer Mfg. # N90281802 (4 needed) $3.40ea, $13.60 total
***I went with Motul Gear 300 75w90 for the G 052 145 S2 specification (1 Liter) $22

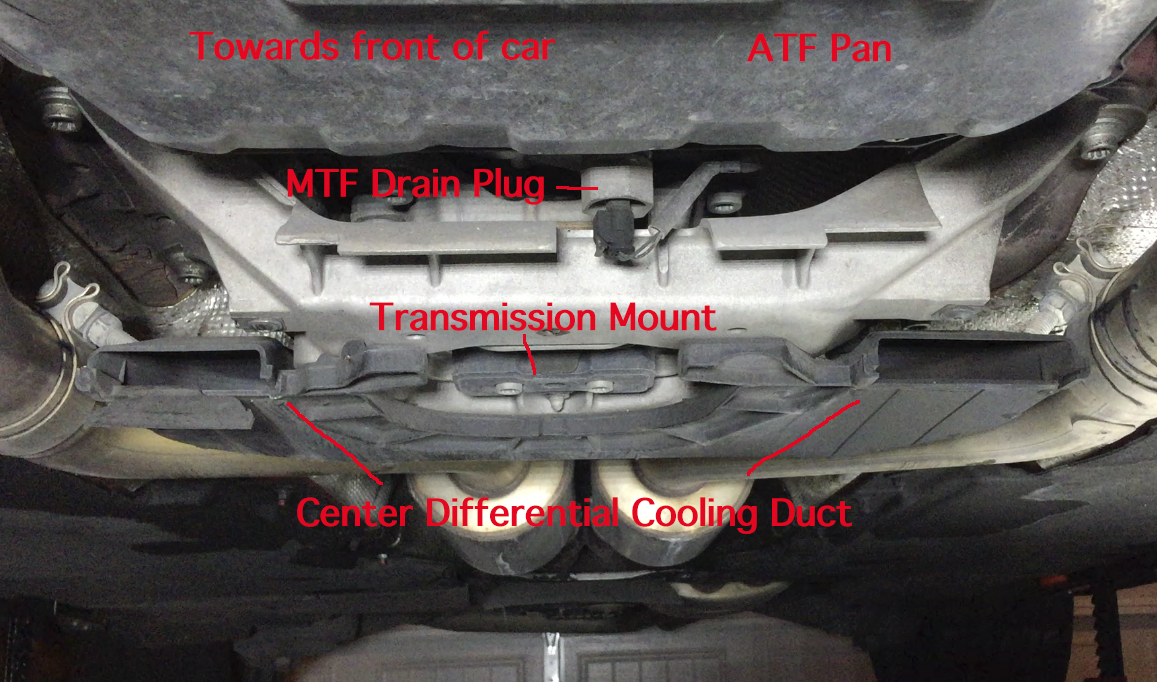
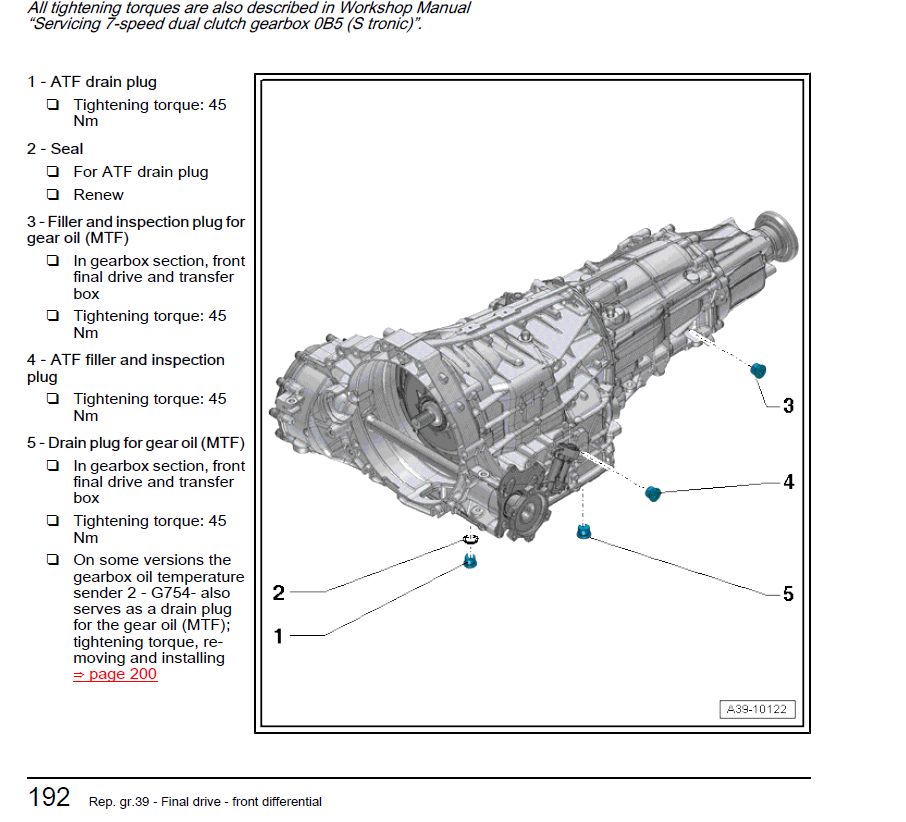
The transmission in the RS5 is the 7-speed S-Tronic DL501, sometimes called OB5. It integrates a front and center differential and is a “dual clutch” transmission (DCT). This transmission is also used in the supercharged S4/S5, S6, S7 as well as other models. Again, it may have internal differences and due to the higher redline of the RS5, uses different transmission control unit (TCU) programming. There is a new longitudinal S-Tronic being manufactured in China for FWD cars. I believe it’s called the DL387 but it doesn’t share much with the DL501.

The DL501 is rated at 406ft.lb of holding capacity. Aftermarket TCU tunes allow the transmission to handle more torque. I have the gear ratios and I’ll add those here soon.

Like the differential, the DL501 transmission uses two different transmission fluids and has two separate chambers for each fluid. Some DCT’s, like the one found in the Nissan R35 GTR, house all of the mechanics, gears, actuators, clutch, in one housing and use two fluids. That expands the fluid requirement by a good amount.

On the DL501, one chamber houses what’s called the mechatronics unit along with the wet clutch pack. This is composed of hydraulically-actuated gear selectors along with the electronics to control them. Think of it as a robotic left leg. Fluid in this side of the transmission is referred to as ATF fluid.

The “mechanical” side houses the actual gears as well as the front and rear differentials. Fluid inside this chamber is referred to as MTF fluid.

The genius in this design is it narrows the fluid specification down as one fluid is not required to do all things.

The two fluids used in the transmission are different from the differential despite both having an MTF and ATF side. It’s confusing but again, the fluids are specified differently due to different properties needed by the internal components.

Here’s a good video to watch.

Servicing the DL-501 S-Tronic Transmission

One more video, this one shows the wet clutch for the DL501 being taken apart. There’s some interesting tidbits there and you get an idea of why Audi uses a very specific fluid for the ATF side which services the mechatronic and the wet clutch.

Transmission OEM fluid part numbers
ATF: VAG G 052 529 A2 (7 liters)
MTF: VAG G 055 532 A2 (5 liters)

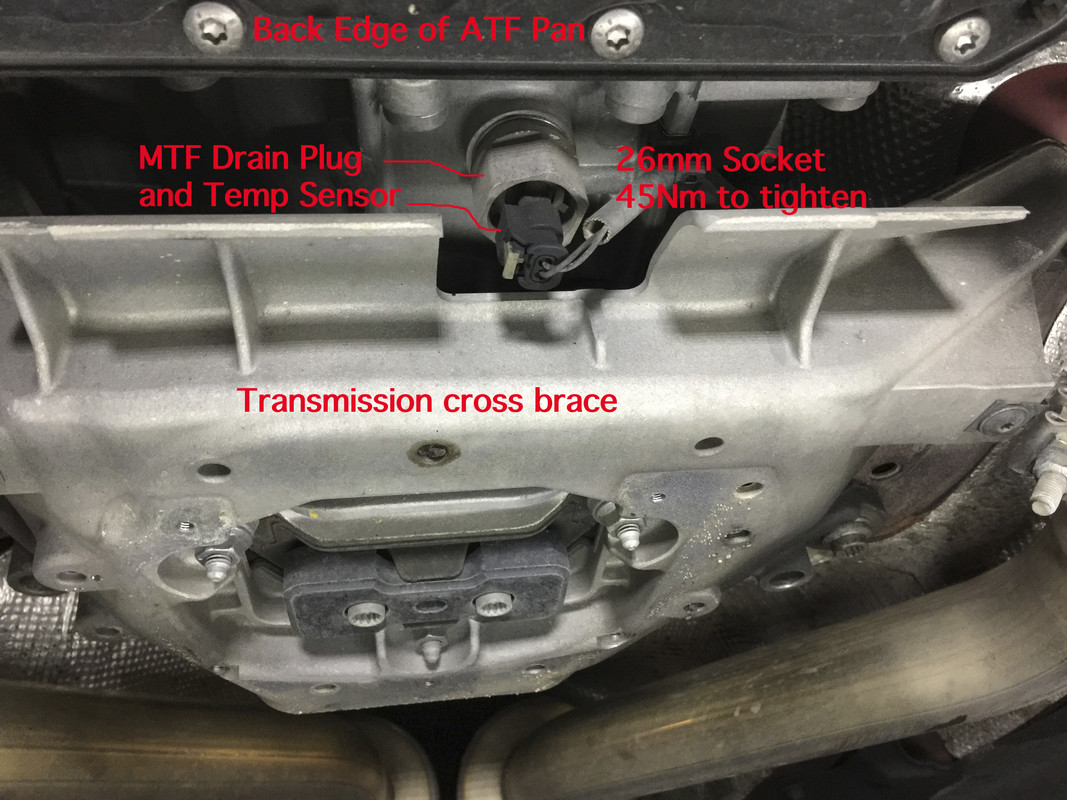
The manual transmission fluid (MTF) or gear side fluid specs aren’t well known. I did find specs on a Polish Audi site here: https://www.vw-group.pl/files/MSDS/G__055532.pdf

My polish is a bit rusty but I can glean some specs.

VAG G055 532 Specification
VIS @ 212F=8.0
VIS @104F=40.0
Viscosity Index=?
Pour Point -?
Flash Point 392F

It lists G055532 but not the “A2” part. It is not a thick oil to say the least so I’ve decided, based on the specs I’ve found for other supposedly compatible oils, to stick with the OEM fluid. I very much wanted to use the Motul Gear 300 but I cannot guarantee it’ll play nice with the front or center differential. I’m not sure if it has the right additives package.

The specifications for the ATF side, G 052 529 A2 are apparently known by many oil manufacturers and there’s a wide selection of fluids available which meet this specification. Some of these “DCT” fluids actually meet BOTH gearbox specifications, that for the ATF side as well as the MTF side. Motul Multi-DCTF is a great example of this. I’m steering clear of those fluids and here’s why; as mentioned before, Audi created two different specifications which most likely perform better in their respective environments than a do-it-all fluid. The ATF side of the transmission isn’t exposed to gear shearing like the MTF side and likely needs a thinner fluid to heat up and cool down more quickly. It’s operating hydraulic actuators and maintaining the proper friction ratio for the wet clutch packs, similar to a motorcycle oil that not only lubes the engine, but the transmission and clutch too. It’s also in charge of cooling down the Mechatronic electronics controller which is internal. Early DL501 transmissions often failed when the electronics board burned out (Pre-2012). The electronics board itself is now a serviceable item and can be bought and installed separately.

Here’s a full list of all of the “ATF” fluids which meet G 052 529 A2 specifications:

Redline DCTF 100% synthetic (Lists G 052 529) https://www.redlineoil.com/Content/files/tech/DCTF_PROD_INFO.pdf
VIS @ 212F=8.1
VIS @104F=40.7
Viscosity Index=177
Pour Point -50F
Flash Point ?

Motul Multi-DCTF Semi-Synthetic blend https://s3-eu-west-1.amazonaws.com/m...pdf?1510939252
VIS@212F=7.3
VIS@104F=33.8
Viscosity Index=189
Pour Point -49
Flash Point 385F

Rowe ATF DCT II Full synthetic
Viscosity @ 104F 32.8
Viscosity @ 212F 6.6
Viscosity Index 175
Flash point 366.8F
Pour point -40

Ams oil DCT Fluid 100% synthetic (meets G 052 529) https://www.amsoil.com/lit/databulletins/g3431.pdf
Amsoil
VIS @ 104F=38.8
VIS @212F=7.7
Viscosity Index=177
Flash point=446F
Pour Point -72.4

Pentosin FFL-4 Not confirmed to work with the S-Tronic yet http://www.pentosin.net/specsheets/pentosin_ffl-4.pdf
Viscosity at 104F 36.3
Viscosity at 212F 7.0
Viscosity Index 173
Pour Point -51°C/-59.8°F
Flash Point 224°C/435.2°F
A note on Pentosin products. If you do some research, you’ll see they recommend their FFL-2 for the S-Tronic. Well, that’s NOT for the DL501 but rather the new FWD S-tronic DL387 which has a far lower torque rating.

Liqui-Molly 8100 DCT Fully synthetic (meets G 052 529 A2) https://pim.liqui-moly.de/pidoc/P000...00-31.0-us.pdf
Viscosity @ 104F 33.0
Viscosity @ 212F 6.85
Viscosity Index 174
Flash Point 392F
Pour Point -54F

Castrol Transmax Dual Full synthetic https://msdspds.castrol.com/bpglis/FusionPDS.nsf/Files/8CA4D9C7A952E6C98025803C004AFC36/$File/BPXE-AEX992.pdf
Viscosity @ 104F 35.5
Viscosity @ 212F 7.2
Viscosity Index 166
Flash Point 446F
Pour Point -97F

Millers Millermatic ATF DCT-DSG Full synthetic https://www.google.com/url?sa=t&rct=...Kr-npFR_9Na03X
Viscosity @ 104F
Viscosity @ 212F
Viscosity Index 1
Flash Point
Pour Point

Torco DCT 100% synthetic
Viscosity @ 104F 7.0
Viscosity @ 212F 33.9
Viscosity Index ???
Flash Point -54C
Pour Point 383F

Dodson Motorsports DMS Euro
This is a company out of Australia which does a lot of DSG work on various cars from the Lamborghini’s S-Tronic to Evo’s to R35 GTR’s to Porsche, Audi and VW. They list no specifications on their web page and didn’t really give any up to me when asked although they were helpful in other regards and said if we start breaking transmissions, they’ll make them stronger. They are looking at uprated clutch packs now.
https://www.dodsonmotorsport.com/audi/fluids/heavy-duty-transmission-fluid.html
Interestingly, they list their fluid operating temperature range between 70-90 celsius. The RS5 typically sits at about 101 degrees celsius. There’s also a nice little chart on their page which lists the specs for clutch grip, gear lubrication and longevity for their various fluids. They have three GT-R fluids and it’s interesting to see the tradeoff (albeit really simplified) between them.

So now that you’ve picked the fluid you’re going to use (or pulled your hair out), here’s a full parts list of what you’ll need for the ATF side. It does pay to shop around. One place may have all the hard parts but charges $5 more a liter for the fluid. So look around and find the best deal you can. I do always try to support the Audi performance sites that support us, especially when they have a good web page and answer questions. I’ll pay a bit more even. But no communication, no sales. And quite frankly, some of the websites are really poor from an e-commerce standpoint. Others are huge but have inaccurate or incomplete information. So do your homework!

Transmission ATF Parts List (or what I purchased and cost!)
(7)Liqui Moly 8100 DCT Fluid- $13ea, $91 total with free shipping
(15)Transmission ATF pan bolts, part number N91096801 (M6x20), $1 each, $15 total.
(4) Subframe crossbrace Hex head bolts Mfg. # N91151101 $3.70ea., $14.80 total
(2) Subframe Torx head bolts Mfg. # WHT005372 $4.99ea $10.80 total (Note, a washer is sold separately but they threw them in. Can probably reuse those.)

For the following, I purchased it as a “kit” through ECS Tuning but had to do a small work-around to qualify for free shipping. These are the OEM part numbers.
(1) External Transmission filter gasket (o-ring) Mfg # WHT003379
(1) External Transmission coolant circuit filter Mfg. # 0B5325330A
(1) Internal DSG Filter, Mfg. # 0B5325429E
(1) Pan gasket Mfg# 0B5321371F
(1) ATF Drain Plug Mfg. # N0138157
(1) ATF Drain Plug Washer Mfg. # N0138275

I chose to purchase one of the ECS kits which use OEM quality but aftermarket filters and components but I had to purchase the kit that does not include the external filter and 0-ring gasket. That I had to purchase separately. The kit which comes with all of those components isn’t listed as qualifying for free shipping even though it contains the same exact external filter. I’m sure it’s just an ECS glitch.
Kit: https://www.ecstuning.com/b-assembled-by-ecs-parts/dsg-automatic-transmission-service-kit-without-fluid/0b5325429ektkt2/
External Filter: https://www.ecstuning.com/b-hamburg-tech-parts/dsg-transmission-cooling-filter/0b5325330a~ham/

ECS throws in their magnetic plug even though the pan itself already has two giant magnets.

(1) ECS ATF Filter/Gasket kit ECS # ES#3200790 $73.99
(1) Hamberg Tech external filter ECS # ES#2972736 $12.31

That’ll give you the other “kit” ECS sells which for some reason, doesn’t include free shipping, even though it’s exactly the same.

MTF Side Parts List
(5) VAG G 055 532 A2 (That’s five liters)

Here’s a photo of everything needed to service the transmission and rear differential.

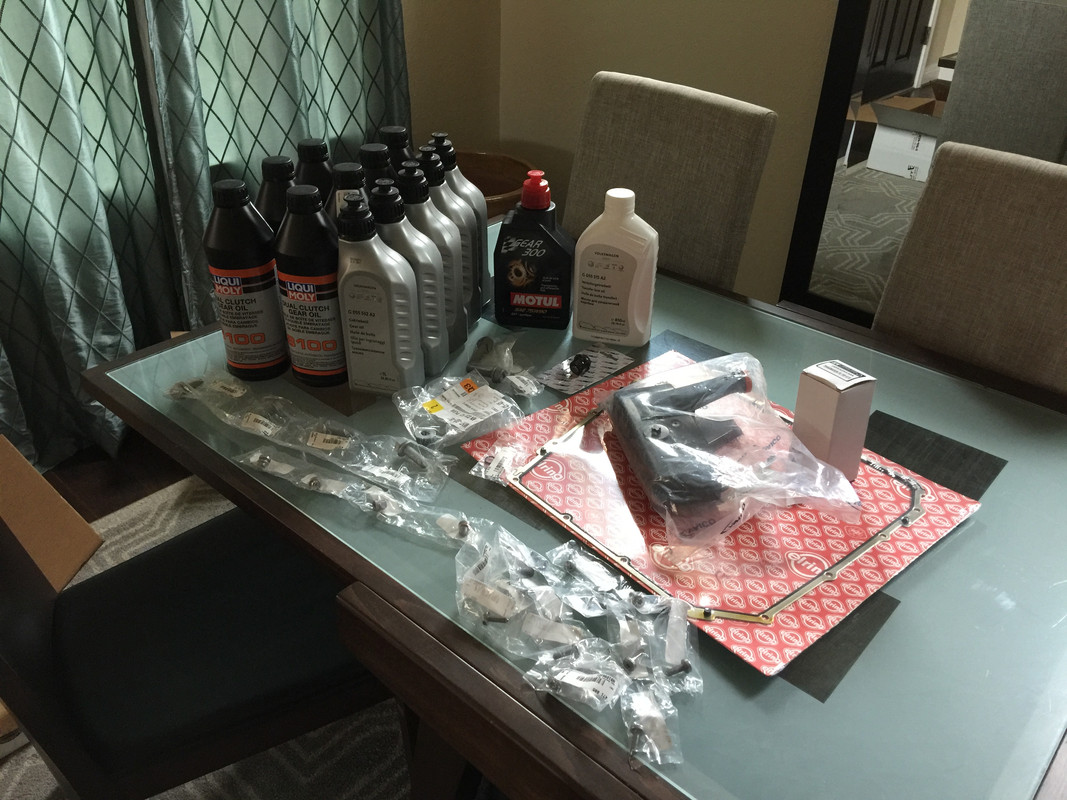
Next post, rear differential how to.

REAR DIFFERENTIAL FULL SERVICE DYI
The rear differential fluid change procedure in a nutshell is removing two fill plugs, two drain plugs, installing new plugs in all four positions and filling each chamber with the right fluid. From a no detail point of view, it’s pretty easy.

On a difficulty scale, I’d rate this as a 4 out of 10. The two most important steps are avoiding cross-contamination and getting the car level. If you remove those two, it’s a difficulty of 2 out of 10, easier than changing your oil.

***Keep this in mind: both of the ATF fill and drain plugs are located on the Driver’s side of the differential and the ATF fill plug actually says ATF below it. The MTF plugs are located on the passenger’s side. Both were marked with blue dye.

ATF-Driver’s Side
MTF-Passenger’s Side

Repeat this several times in your head so there’s no confusion. Screw this up and it’ll ruin a very expensive differential.

Tools needed
3/8 or even 1/4” ratchet, short extension and universal joint swivel.
5mm allen socket
Small torque wrench that can spec torque down to 15Nm
A catch container for the used fluid
1L measuring container (this was my catch container)
A fluid pump of your choosing
A few large containers of denatured alcohol
Four jack stands
A low-profile jack
A rubber frame weld puck to use as a jacking point
Paper towels
Latex gloves

Photo of the fluids needed. The two small containers on the right have used fluid in them.

Tips!
-The ATF-side fluid is very thin and easy to pump. The MTF gear oil side is thicker but you only need to pump less than one liter and it’s still fairly easy to pump. With that said, double up your fluid pumps. Just get a cheapo pump like this from Amazon: https://www.amazon.com/dp/B000BQW5LK/ref=sxts_kp_bs_1?pf_rd_m=ATVPDKIKX0DER&pf_rd_p=8778bc68-27e7-403f-8460-de48b6e788fb&pd_rd_wg=Yg9XR&pf_rd_r=RZS4G08912WCF00QER3A&pf_rd_s=desktop-sx-top-slot&pf_rd_t=301&pd_rd_i=B000BQW5LK&pd_rd_w=IW8tj&pf_rd_i=fluid+pump&pd_rd_r=227873e7-91ef-4d96-b448-a8c73d3afc67&ie=UTF8&qid=1541987852&sr=1

But get TWO. Why? Fluid contamination is a real thing. The pumps are cheap and you won’t have to spend time flushing the pump out with denatured alcohol. It’ll really speed up the process.

The fill port is .375” or 3/8”. It’s relatively small. Make sure you have a fill tube that’ll fit into the port.

ATF Side
Torque Specifications
Inspection Plug 15Nm
Drain Plug 15Nm
Use new plugs for both the drain and inspection port.

ATF Fluid Temperature between 50F and 140F when filling.

Blow by Blow Steps
-Jack the car up at all four corners and make sure the car is level front to back and side to side. I used a long bubble level, about 4ft., to check. A lift makes it far easier to get the car level. If you do not have a long bubble level, you can measure from the concrete to the jack position on all four corners.

-On the driver’s side of the differential, look for the drain (on the bottom) and inspection/fill plugs (on the side above the ATF designation).

-Remove the ATF inspection plug first using a 5mm allen socket. This way, if you cannot get the inspection plug out, you can still drive the car to the dealer and have them remove it. Honestly, it shouldn’t be difficult to loosen as they’re not on there tight.
Here’s a closeup. It’s right above the “ATF” symbol.

-Make sure your collection container is in place. Remove the ATF drain plug using a 5mm allen socket and allow fluid to drain into the container.

-Install new ATF drain plug and torque to 15Nm. It was a tight fit but I was able to get my torque wrench in there. The exhaust pipes create interference.

-Fill with new ATF fluid through the inspection port opening until fluid begins to drip out a bit. Let the fluid settle for a few minutes then continue to pump in fluid slowly until it starts to run out the inspection/fill hole again. I physically measured the fluid that drained out and filled it with the same amount. Waiting for the fluid to settle allowed me to get the full amount in.

-Install the inspection plug hand tight. From here on out, it’s a bit different from what I did.

Here’s what Audi will do next. The sport differential needs to be primed after a refill. The Ross-Tech VCDS cable/program does NOT have the capability to prime the active differential pump, hence the reason I measured the fluid drained and the fluid pumped back in. But read on.
-Connect the diagnostics module to the car and turn the ignition on.
-Select 22-AWD Electronics in the vehicle diagnostic tester under “Guided Functions in the directory.
-Follow the instructions given by the vehicle diagnostics tester exactly.
-Repeat the filling process if the system detects there is still air inside the system after performing the “22-ATF Filling” function.
-Remove the ATF check plug again (should only be hand tight!)
-If necessary fill the ATF and run diagnostic function again.
-Install the new ATF inspection plug and torque to spec.

If you do not measure the amount of fluid drained and filled, the car will need to be lowered off the lift and driven for a bit to cycle the electronic differential pump, prime the system and purge the air to the top. Once that’s done, place the car back on lifts, level again, remove the inspection port on the ATF side and add fluid if none drains out of the inspection plug.

Gear Oil Side
-Inspection/fill plug torque specification is 15Nm
-Drain Plug torque specification is 15Nm
-OIL Fill TEMP 50F to 140F
Use new plugs for both the drain and inspection port.

-Remove gear oil check plug first

-Remove the gear oil drain plug and drain differential gear oil into your collection container

-Install new drain plug and torque to specification. It’s tight on the gear oil MTF side so I had to use a universal joint swivel and an extension

-Fill the differential with gear oil until it begins to drip out the inspection hole. The car must be level for this. When fluid starts to dribble out, install the new inspection/fill plug and torque to specification.

-Wipe off any excess fluid and wipe down with denatured alcohol and a paper towel or rag.

Notes
-Drained fluid on the ATF side came in at 650ml. When I opened the ATF inspection port for the first time, fluid leaked out.
-ATF fill came in at approximately 650ml.
-The Audi ATF differential fluid container is 850ml so not much wiggle room.

-Drained fluid MTF side came in at 760ml. When I opened the inspection port, no fluid came out.
-MTF fill came in at a bit less than 900ml.

Both the drained MTF and the ATF definitely looked used. They were not clear and very opaque in the measuring container, the color of coffee. I’d be really interested to see what the ATF side looks like on a car like the S4 or S5 where it’s a 100K drain interval. I’ve saved samples of both and will send them out soon for analysis.

Used ATF fluid after draining

Used MTF fluid after draining

Here are the old drain/fill plugs. Note the integrated copper washer.

In the process of editing the video but honestly, it’s really not needed as it’s a simple job. Will be doing the transmission in the morning.

A couple of quick notes. First, the transmission fluid while still dark, looked far better overall than the differential fluid.

If you’re doing both sides of the gearbox on the same day (and into the night), do the manual gearbox fluid FIRST then do the ATF. I’ll explain why later in the post.

If you’re doing this on jacks, and not a lift, I would use measuring containers, especially for the MTF side as it’ll make filling the MTF side easier and you’ll know you have the proper amount of fluid in there.

You can shim in between the jack and the frame rail with cardboard. I was able to get measurements within 1mm of one and other this way.

Transmission Torque Specifications
-ATF Housing/Pan bolts 10Nm
-ATF Drain Plug 45Nm
-ATF Fill and Check Plug 45Nm
-Transmission Fluid (MTF) Fill and Check Plug 45Nm
-Transmission Fluid (MTF) Drain Plug 45Nm
-ATF external filter cover 8Nm (depends on type)

Subframe Brace Torque Specifications
-Hex bolts-90Nm + 135 degree turn (66.3 ft. lb)
Triple Square bolts 90Nm + 90 degree turn (66.3 ft.lb.)

TOOLS LIST
Big bucket to dump fluid covered parts in. Make sure it’s clean to start with and something you can throw away
Denatured Alcohol and acetone for cleaning purposes. I purchased two gallons of denatured alcohol.
Paper towels, one ton.
Two tons of latex gloves (yes, it’s a dirty job)
Two measuring containers, a 1L and a 5L. Can use later to make really big pancakes.
Four jack stands or if you’re lucky, an actual lift.
A bubble level
Big ruler (to help with leveling)
A medium-sized cardboard box you can cut up
Absorption mat for any spilled fluid
A crawler or cushioned mat
Good work lights so you can see what you’re doing (extremely helpful)
Fluid transfer system of your choice, one each for the MTF and ATF fluid
Clear Vinyl tubing, 4-5ft. in whatever size needed (will depend on your fluid transfer hose/adapter size)
Ratchet set, 1/4” to 1/2” as needed
Long breaker bar for subframe brace bolt installation
Torque wrench (torque specifications run from 10Nm to 90Nm. Make sure you can cover the spread)
10mm Allen socket
M8 Triple Square socket
M14 Triple Square socket
7mm hex socket short
8mm hex socket short
10mm hex socket short
17mm hex socket short
18mm hex socket short
26mm hex socket short
T25 Torx bit
T27 Torx bit
T30 Torx bit

Step One-Under Tray and Center Differential Cooling Duct Removal
Get the car up and level on all four corners, front to back and side to side. I used cardboard as “shims” between the frame pinch weld and the jack stand heads to make minor adjustments. I also chose to remove both front wheels to give me a bit more working room. Up to you but it does help if you’re crawling underneath the car.

Now that the car is up, we’ll need to expose the bottom of the car. You’ll be removing the undertray/splash shied as well as the center differential cooling duct which bolts to the transmission mount/cross member.

A little tip, DO NOT use power tools to loosen any of the bolts. They’re easily stripped, especially the triple square bolts and a pain to saw or grind off the ends. Just loosen by hand and then use your power tool of choice to get them off quickly thereafter. Same goes for putting them back on. Torque them down by hand. I didn’t go by the torque settings, I just make sure they’re snug.

Splash Shield Removal
All told I had 30 fasteners which needed removing. I’m missing a few inside the fender so I’m sure the total is probably closer to 32 or 33.

List of all the bolts requiring removal
(6)7mm hex head bolts in the wheel wells (3 in each)
(5)M8 triple squares. I think there’s supposed to be six, towards the center/back of the shield. I’ve always had five but it looks like there’s a hole for one more.
(2) T25 Dzus quick release screws
(4)T27 coarse thread screws
(4) T25 screws, non-magnetic
(6) T30 screws

If I remember correctly the Dzus connectors are on the passenger side and hold a duct mouth that looks like it goes to cool the engine block mounted oil cooler. Anyway…it’s held on by two screws. You’ll see the mouth of the duct and two torx screw heads on either side of the mouth. If you forget to remove them and pull the duct out, no worries, you can push the duct back in and it snaps into place with a bit of patience.

Five (possibly 6!) of the M8 triple square bolts towards the back, center part of the under tray. These’ll strip out if you use a power tool to remove them. Ask me how I know.

Six of the T27 coarse thread screws that go towards the leading edge of the under tray nearest the nose.

Other than that, it’s very straightforward and easy to figure out which bolts don’t need removing. The whole pan will slide towards the back of the car and drop out. It’s a big piece, a little heavy and a little ungainly but it’ll come out as one unit.

Center Differential Cooling Duct
The center differential cooling duct is bolted to the bottom of the transmission. It’s just five T25 torx head bolts. Undo the bolts and it’ll drop right out. Super easy.

Locating the Drain Plugs
With everything exposed, it’s time to find the correct fill and drain plugs. Depending on year to year variation, all four plugs (two drain, two inspection/fill) are identical. All are the exact same size in terms of plug diameter and thread pitch and all need a 10mm allen socket to remove them.

I have one variation which other cars may not have, the temperature sensor for the manual portion of the transmission doubles as the drain. It’s just aft of the ATF pan, dead center, and in front of the transmission mount. It has an electrical connector and is hex shaped. The connector comes off easily by sliding a small white lock down towards the ground. Once that’s extended out, you can pull the connector off easily. Only do this when the engine is off and make sure it’s plugged back in before turning the car on again otherwise it’ll store a fault code. Also, avoid getting any transmission fluid on the outside of the connector or the plug itself. If you get any on it, clean it off right away.

It’s important to change the MTF fluid first as to properly fill the ATF side, the car must be running. Best to have oil circulating (100% necessary) in the mechanical gearbox side while the car is running as you do have to put the car into gear.

Closeup of the transmission plugs. They all use an aluminum washer and in my opinion, all can be reused so no need to purchase new ones. I purchased new ones anyway along with new washers.

MTF Inspection/Fill Plug Location-Driver’s side, rear of the transmission, above the cross brace.
The drain plug on mine was located on the driver’s side rear of the transmission. It’s slightly in front of the center differential and it’s a bit hard to spot due to the transmission brace being in the way. You do not have to remove the brace! But it is a tight fit and you’ll need to find the best body position to get your hand up there quickly to put the fill plug back in.

Here’s the MTF inspection/fill plug. It’s a bit hard to see looking up. Front of the car is on the left, rear on the right. Looking up.

The ATF drain plug is on the black pan on the bottom of the transmission. Hard to miss but don’t confuse it with the oil pan! The ATF drain plug is an M10 allen head, quite different from the 14mm hex head oil drain plug.

The ATF inspection/fill plug is located on the driver’s side and is easily visible just behind the external transmission cooling circuit filter housing. It’ll look just like the drain plug (10mm allen head).

Cliff Notes Blow By Blow

-Remove the noise insulation/splash shields from the underside of the vehicle
-Remove the wire on the cross brace which is held in by small clips. I was able to push the clips out with my fingers.
-Remove the six bolts (four hex head and two Triple Square head) securing the subframe cross brace to the chassis. The cross brace has some weight so be prepared to support it and lower it to the ground.

MTF Side
Drain plug torque specification is 45Nm
Fill Plug torque specification is 45Nm
My drain plug doubled as a temperature sensor and was depicted wrong in any of the workshop manuals. Comes off easily and very accessible but it is a 26mm socket (short is fine) so make sure you have one of those before starting.

-Make sure the new gear oil is at about 68 degrees F, room temperature
-Slide the used oil collection unit underneath the gearbox drain which is located just aft of the ATF pan.
-Place a cloth over the tunnel cross member to keep oil from getting into the cast pockets when the fill/inspection plug is removed.
-Remove the transmission fluid level inspection plug first. Fluid may come out of the inspection port so be prepared.
-Remove the transmission drain plug and drain the fluid into a container.
-Install a new transmission drain plug and torque to specification or reinstall the temperature sensor.
-Fill with new transmission fluid until it begins to run out of the hole and let it sit for at least 15 minutes so the fluid settles internally.
-From then, add 50ml every 15 seconds until the transmission is full. The MTF must be up to the lower edge of the check/fill hole.
-Tighten the fill plug to specification (45Nm)

ATF Side
-Loosen the ATF fill/inspection plug with a 10mm allen socket. Fluid will drain out so be prepared to catch it with a container.
-Carefully loosen the ATF drain plug with the 10mm allen socket and drain the fluid into a container. Reinstall the drain plug, hand snug.
-With the fluid drained, Diagonally loosen the bolts 1-15 on the ATF pan with a hand tool using the T30 torx bit.
-Remove the ATF pan noting there may be more fluid in the bottom of the pan so carefully balance the pan as to not spill the fluid. The pan may take a bit of effort to remove and the internal ATF filter may fall off as well so be prepared. My pan came off with no effort.
-Remove the internal ATF filter by pulling down and towards the rear of the car at the same time. Again, it’s filled with fluid and will spill out. Be prepared to catch the fluid.
-Remove the external ATF cooling circuit filter next. If equipped, loosen the securing strap and remove the anti-twist mechanism. Place a collection container below the filter as fluid will drain out when the cap is removed. I had a self-locking cover that has notches to keep it from spinning off. More fluid will drain from the housing.
-With the cap off, pull forward to remove the ATF filter, then slide it behind the two hoses and remove from the vehicle. More fluid will drain.
-When installing the ATF filter, it must not come in contact with water. Even the smallest amount can cause damage to the filter so wear gloves.
-Coat the seal on the end of the atf filter with a bit of atf fluid and reinsert in the housing, with the protruding end going in first.
-Install the cover by screwing it on by hand.
-Tighten to 8Nm. If you have the self-locking cover, tighten it until it’s at the last locking notch.
-With the pan on a work bench, clean off the mating surfaces on the pan as well as the magnets (2) and wipe out the entire pan. I used acetone on the pan’s mating lip, then denatured alcohol. Do the same for the bottom mating surface on the transmission.
-Install the gasket on the pan with the nubs facing down. The nubs will lock the gasket in place.
-Install the new internal filter, cleaning the recess that accepts the end of the filter nozzle so there’s no ATF fluid in the recess where the tip of the nozzle goes. This will allow the filter to stay in place. Note the indexing pin on the top of the filter and make sure it’s fully seated. Move it around so you understand when it is and is not fully seated.
-Install the transmission pan and tighten the new bolts to 10Nm in a cross pattern.
-Fill with new ATF fluid until it just starts to dribble out the inspection port. Install the inspection/fill port plug by hand.
-After filling the ATF transmission fluid, the fluid level should be checked. Using the VCDS, display the ATF fluid temperature. It should be no higher than 86 F at start of test.
-Start the engine with the selector level in “P”. While pressing the brake pedal, vehicle idling, shift through all the selector level positions, holding each position for at least 2 seconds. P-R-N-D-S. Move back to N then to P and run engine at idle.
-When the temperature reaches 86F, unscrew the ATF inspection plug. If no fluid drips out, add more fluid.
-The ATF inspection plug MUST be closed again by 122F.
-Tighten the inspection plug to specification (45Nm).

Once you start the engine, fluid is pumped throughout the transmission and the fluid level in the pan diminishes significantly which is why you’re able to put more fluid in the transmission.

-Re-install the subframe brace and torque all six bolts to specification. The initial torque setting is easy but the additional rotation degrees took some effort and I used a long breaker bar to accomplish that task.
-Reinstall the splash shield/sound insulation.
-Breathe sigh of relief that you’re finally done and won’t have to do it again for another 20,000 miles (or two years, whichever comes first!).

Incredible work. Thanks so much for your time. This is going to really help a lot of people. Great work

1 Like

Appreciated! Not 100% done yet, I have a few videos that I need to edit and put together and I’ll add those here soon.

Finally finished the video. Took forever and a day.

3 Likes

Woth it. Looks great so far as much as I have watched.

Looks like Erwin doesn’t allow USA location users to register for some reason. They send you to some Audi sponsored website if you want to purchase a flat rate but it still requires a valid Erwin user ID!

I didn’t have problems with it. I downloaded for 3 different cars.

I’ll post a screenshot of what I’m dealing with. Also, does the MTF sensor/drain have a washer? Mine didn’t when I removed it. I didn’t replace it with one either.

Ok big edit: only 1 of the plugs for the MTF/ATF out of 4 had a copper washer and that was the ATF pan drain. Is this normal!?

Another edit: apparently it’s not normal. All drains need washers but mine weren’t really leaking anyways. I had added them all. My last concern is the MTF on the transmission itself. I only was able to add about 3.5 liters before it started pouring out, which seems low. I unfortunately don’t know how much I removed. Does anyone have a number from when they did theirs?

It seems normal:

But as you say from the Redimist service instruction video appears he has them (at least for the MTF fill plug as well):

I have the full service manuals linked on another thread here.

Now, I would just fill it up according to this (I assume it is empty):
image

That also explains why you don’t need a washer.

Did you guys find the fitting from the for the MTF and ATF filling plugs, REDMIST mentions he got from the Schwaben oil extractor in the s-tronic service video? Or did you get the pump in the manual:

image

I went back and added the big silver washers. I had already filled the MTF so you can imagine how fun that was. Ape had mentioned on one of his YouTube comments that yes indeed all of the plugs need washers.

I didn’t order the correct tool so I didn’t have that fill plug adapter, however a larger $10 hand pump emptied a bottle in just a few pumps. The extractor I ordered from ECS isn’t as nice as Ape’s.
I know that all of these fluids are “full til it comes out” but I can’t help but doubt myself and worry I’ll destroy a very expensive transmission. That’s why I asked, good ole anxiety.

It should work with any handpump then since the VAS one is basic.

Are you saying since you only need to fill up to the bottom of the filler hole there is no need for an adapter if the car is completely level or tilting slightly with the filler hole up (also per the service manual).

Will check with a bubble level or some app if I can’t get hold of the adapter and as a starting point find somewhere with level ground.

Yep, I had washers on mine. I used the Schwaben fitting for less potential mess BUT I was also using the measuring technique, not the fill til it overflows method.

I mostly did this to avoid under-filling in case the car wasn’t level left to right or front to back. I actually used a level to check but I felt measuring the extracted fluid was going to be more accurate.

1 Like

Hi. I didn’t understand the procedure for oil change sport rear differential ?. For reset air circuit. Is it possible to do this with the VCDS? Or need another electronic valise ?

I didn’t reset mine. Just a drain and fill. I’ve driven a few thousand miles since and have driven it very hard.

What I do is service the diff then immediately drive in a figure 8, first left, then right. That’ll help prime the system and remove all the air bubbles. It helps that I live at the end of the cut-de-sac. Never had a problem with this method and I’ve now serviced the diff twice.

I’ve done the same as Ape and have serviced mine twice now with no issue’s.

@Ape_Factory just checking, in the end, did you go for Motul 300 also for the MTF on the gearbox? As it says here: https://youtu.be/EPdEquH8sXg?t=1033

I am guessing not and getting it for the rear diff only.

I eventually got a response from Motul. I guess everyone was on vacation but two months later, I received a call from one of their techs and they said yes, it’s fine to run Motul 300 in the transmission on the gear (MTF) side. It’s time for me to swap out the MTF fluid so I’ll be going with it in the gearbox now as well. I’ve used it in the rear diff for some time.