
this is an issue across all the audi FSI… In the next few weeks. There should be some good carbon information and cleaning information posted. I know there is something in the works
Someone i know that also has an S6 recommended get a Terraclean done as that helps remove the deposits? Has anyone tried that on the Audi engines?
The FSI motor wont be able to use the cleaner for spraying onto the valves as the injector is post valves. The big help with the fuel system cleaner is to help clean the injectors.
This was very helpful for me but as I was doing it I noticed a few differences with the s8. I don’t know why they would have differences but they do…I still need to do the carbon clean but was going in after a oil leak at the oil filter housing.
I know some people were wondering how to get to the oil separator screws. I used a vice grip with the T30. It gave me more then enough room. Just make sure that your grip is super tight so you don’t lose your bit.
http://i138.photobucket.com/albums/q259/cstarky15/engine%2028_zpsgmojvcbk.png
The left hose in the red circle with the two hoses had coolant in it when I removed it for the manifold. Not sure if this is normal or not but just a heads up to the S8 guys.
Also I had to remove the ground wire that is in the green circle as the wire wasn’t long enough to get over the fuel pump.
There were also 3 colored electrical connectors under the manifold. One was Blue, one was White, and one was Orange. In most of the pictures I’m seeing there are only the Blue and White one.
Why do I have 3?
I bought both gaskets for the filter housing. It appears that only the one that sits inside the V was leaking but figured for an extra $3 why not do the other one too.
The filter housing is attached with 2 M10 triple square bolts and 2 T30 bolts. Once you remove the housing be ready for a bunch of oil to come out as the housing stores a good amount.
http://i138.photobucket.com/albums/q259/cstarky15/20151130_233939_zps0fzktfni.jpg
[/URL]
http://i138.photobucket.com/albums/q259/cstarky15/20151201_001630_zpsg7i5mgq9.jpg
[/URL]
You could also loosen the oil filter, pull it up a little bit, wait a half hour or so for the oil to drain down, and then tighten the filter back down to avoid spilling oil all over the place. It would probably go faster if you open the oil filler cap too. Just saying.
The hoses with coolant you can just bypass those. If you got the JHM intake spacers and I would recomend that you do as they make a big difference in both performance and life health of the motor. The spacer kit comes with a bypass for the coolant lines.
The green wire can get tugged on if you dont loop the harnuss on the other side of it. Removing it is probably just easier
as for the 3 connectors. those are for your knock sensors. Again if you have the JHM intake spacers you can just remove the bracket those 3 connectors are on and zip tie the 3 knock sensors down to the fuel rail under the intake. It really makes for a eaiser job in the future if you have to get back in
Always good tips jimmy
1 Like
All great info. I will be going back in but it will be spring time before attempting to do that again.
A good time to put in spacers. just before the hot season. Did you inspect the intake at all when you had it off
I did, there was carbon build up for sure. But the limited time and cold weather made me want to just fix the leak and be done.
Do we have an update to this elsewhere with details about the carbon clean or is this still in progress? It would be helpful! Thx!
http://audirevolution.net/forum/index.php?topic=3950.msg116391#msg116391
http://audirevolution.net/forum/index.php?topic=4000.0
I might just take the content in both of those threads and make one new thread.
I’m having trouble finding torque specs for the 8 bolts that hold down the air distribution housing. Can’t find them in the Bentley, here or google. For now they are hand tight with a quarter turn. Anyone have any better suggestion?
Just bolt them hand tight carefully… They tend to break easily…
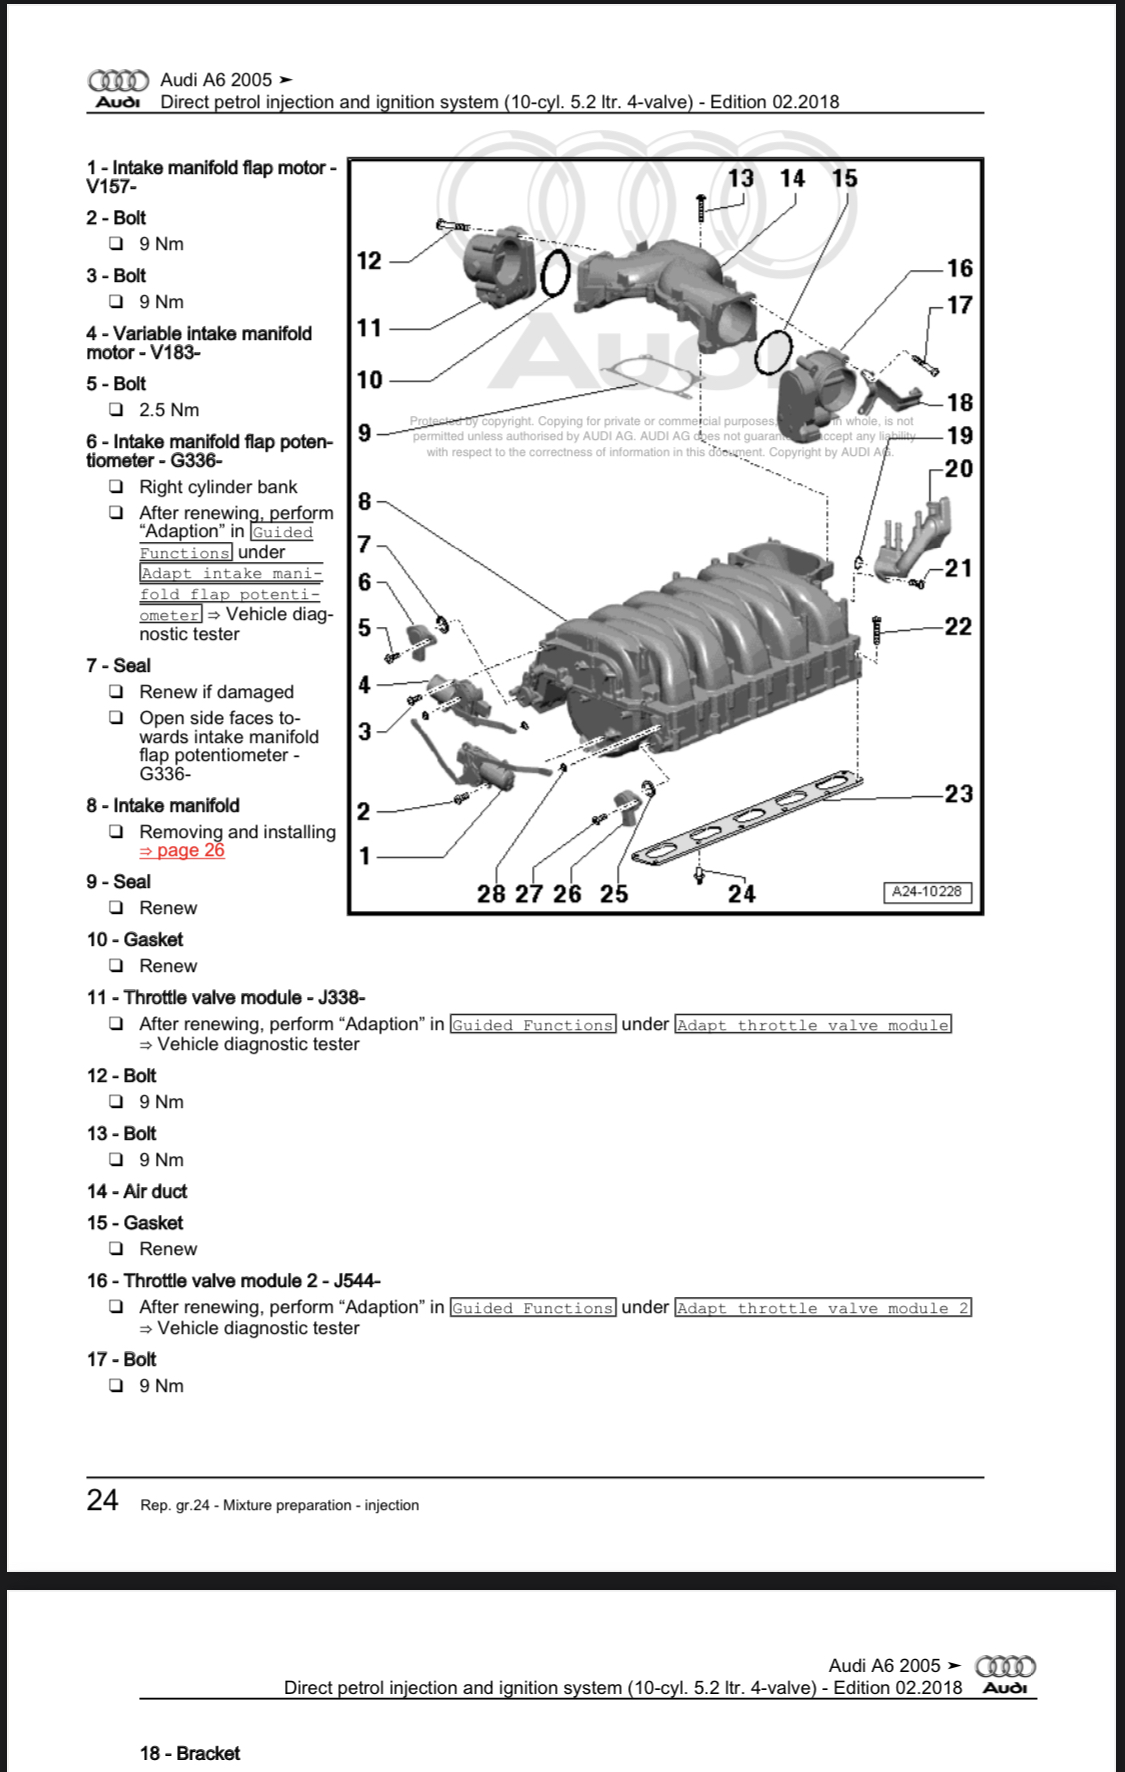
I am not buying that number of 9Nm for a 6mm aluminum bolt. I think too many of us take what is in the Bentley manual as gospel. If you do a bit of searching, you will find instances of where errors in bolt torques have been found before on other vehicles and bolts have been broken as a result.
The topic of the torque on these aluminum bolts for the air distribution housing have been brought up before in other threads.
[Advice Requested - CEL's (cam position actuators & intake flaps)]
Good stuff thanks guys. I believe I had seen that Audi doc in another post but was having trouble finding it. I had also read through Ed’s post as well so I’m aware of the fragility of some of these aluminum bolts. I do also probably fall into the category of being a little too OCD about the torque specs. I do feel better knowing what is recommended however with that said I’ll probably just leave these where they are at for now at hand tight plus a quarter turn which probably isn’t too far off from 9nm.
I also am OCD about proper torque specs and torque to yield bolts, but I can say definitively you are not getting to 9nm on these bolts without them threatening to break.
7.5nm was the most I felt comfortable with.
As long as you don’t have a leak, or God forbid, that ear damaging whine, you are good to go.
Ed
The 9nm is what Audi recommend.
I’ve gotten mine on and of 5 times the last year, always bolted them back with 9nm.
No problems here 
Oh well.
Took off the intake last weekend to install JHM spacers and do some walnut blasting.
When I installed the Y plenum the last of the aluminum screws snapped at 9nm.
Lucky me I had an exact match in stainless, so no more snapping!
Guess I jinxed it.