It has mainly been misfires at idle and up the rpm range, but did get the lean off idle code, too. From my inspection of fuel pressure it looks like it idles at about 30bar, which is 5 bar under the 35-45bar spec, so I am biting the bullet and ordering the HPFPs, as they are weak (but what is weird is they aren’t triggering the low pressure engine codes). Also, when I did the heat-soak test after it had reached operating temperature, the pressure dropped down very quickly (instead of rising to 60bar like it was supposed to). So, I am assuming either the seals in the regulators or the seals in the pumps are having leakage. The stage 1 pump seems to be holding up well, keeps the 5-6bar as I throttle it up. I replaced the fuel filter, just in case, as it is a maintenance item, but it didn’t have any impact (but should help keep the new injectors cleaner). Since I am confident the spark plugs, coils, and injectors are all new, the compression check was ok, the air leaks are minimal, and all the carbon on the intake valves is gone, it seems to be down to not enough fuel (and the fact the idle pressure is below spec). The bucking at idle, and up through the RPM range, seems worse than ever with the new injectors (which if the fuel pumps couldn’t keep up before the new injectors, the starved cylinders would even be more starved if the first cylinders opening are taking more fuel now that they flow well! I checked the resistance of the pump regulators, and those measured 1.4ohms, which was in the acceptable range…and from my understanding you have to buy new pumps to get these, anyways. We will see the pumps in 6 days so after a quick install I will know for sure if they do the trick. I am praying the investment pays off as we have been at this project for a number of months now…and I have another oil leak to fix, and new front suspension links to replace.
Ted
Does anyone know how the high fuel pressure sender (sensor) measures fuel rail pressure when it is screwed into the front of the block, separate from the fuel rails?
Fuel pressure sender is screwed in a fuel line in front of the engine on the passenger side near cylinder 1. Oil pressure sender is screwed into the block.
So my image above from the user manual is wrong?
Yep, looks like the manual I have is wrong. Makes sense it is in-line on the tube connecting the two rails together. It should read somewhere in-between the two rail presssures, then. Thanks for the correct diagrams, they help a ton!
Since I did the heat soak test on the fuel rails, and the pressure dropped quickly after shutting off the engine, I assumed there was a worn pump seal, or regulators, and purchased new pumps. I have them installed and cold started the engine. It seems a little better at cold start but didn’t just turn off the missing issue, bummer. I didn’t have time to get it all the way to op. temp to check heat soak pressure, but will do tomorrow night, and report. Do I need to use VCDS to clear any fuel pressure related adaptations due to the fuel pump change? I need to get it out on the road and running at op temp with some constant rpm’s, right?
When you put on the new pumps did that solve the fuel pressure issue? Is it still dropping as generally you’re going to see the fuel drop from leaking injectors.
I still have to do the heat soak test with the new pumps but I had new injectors installed prior to the last heat soak test when the pressures dropped pretty quickly after turning the engine off. witht he new pumps the cold pressures are running at 34-35bar, instead of 29-30bar… so the pumps are achieving higher pressures. I did remove the battery terminal for 24hrs just to make sure any power cycle adaptations are cleared before I warm it up.
I am working on front suspension links, now, as they are torn and need to be replaced, then I will take it out on the road to get it up to op. temp so I can do the heat soak test.
Anybody have good ideas for getting the upper front suspension clinch bolt removed (other than a lots of heat)? I have been using WD-40 and lots of hammering, but no luck yet. I tried a little heat from a small propane torch but it looks like I am going to have to use MAPP gas on the thing because it is so massive and heat goes right down the knuckle riser while heating!
I did that job on my old A6 4F 2.4 V6 some years ago and last year on my S6 V10… heat didn’t work for me on the S6, and believe me I tried because I knew what was waiting. The A6 had over 500.000km (over 300K miles) … the S6 not so much, but they were stuck and in the end the bolt head broke off 
You muster a LOT of patience, use drill bits in 4-5 sizes and drill a little at a time.
Turn the steering wheel so you can sit comfortable with the drill (low rpm), aim and start drilling. Very often checking progress and very important… direction.
If you are in luck, you will not have to drill all the way through before you can hammer it out.
It took me more than 4 hours… per bolt 
Hope I never have to do that again 
If you don’t mind translating, you can get good pointers from our Danish Audi forum in my thread:
Some of the guy’s over there found some videos for me and in one of them they showed a tool.
Look for VAG6085 or better VAS6085 (still expensive but cheaper nonetheless) 
Have to say I don’t have any experience with the tool… I didn’t have time back then and with the S6 I already had the experience to do the job 
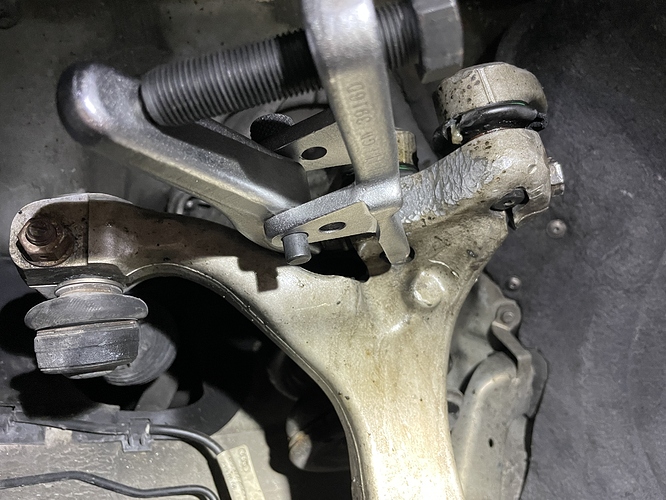
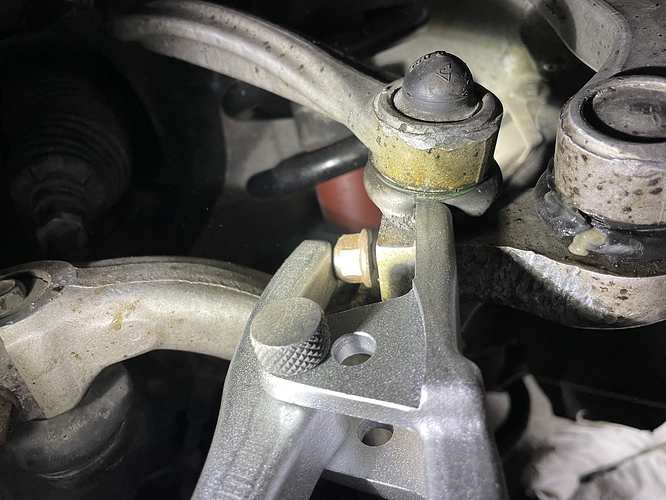
I was able to get one side off by using some heat while applying load on the nut with a ball joint removal tool pounded into the slot for the rear clinch pin! I need to get a new bolt as this one is pretty bent up but at least it came out without drilling, thank god. It definitely takes patients and a lot of pounding, heating, prying, and praying!
You have to use a new nut … not reusable and in such cases I would personally never reuse the bolt either 
Yes, I have a new nut, as well, as the ball joint separator was not nice to it. It took about everything I was willing to give that separator bolt to get this thing to move…actually I had to keep the separator installed, and use an impact gun turned down on the bolt head, while adding heat to the knuckle to get it to turn. Once it was turning I added WD-40 while I was hitting it with the impact gun…and removed the separator to use a wedge to drive it side-to-side. After the bolt was out I used a long wire brush to clean up the ID, so it is now ready for a fully-coated bolt with anti-seize to go back in, and a new nut!
Going to try the same process tonight on the other side…wish me luck, and hopefully it takes less time after the learnings on the first one!

Well…used the same process on the other side, soaking the knuckle in WD-40 and PB Blaster for a few days, heating the knuckle to the point of deforming the boots on the links, and then trying to turn the bolt out. This time, the head turned right off…ugh. So, I used the method of pulling the bolt out by the nut: first starting with 1 washer, then 2, then 3, then a larger nut, then a nut and a washer…you get the ideal. I had to keep the knuckle really hot and then the nut would pull it. The end of the bolt threads finally hit the other portion of the knuckle, and I couldn’t get the nut threaded off any more, so I have to use a hammer to bend the bolt to the side, and thankfully a solid punch through the hole (from the broken off head side) was able to push the remainder of the bolt out of the knuckle. A new bolt and nut and it is back in with the new links…front end is a lot tighter now! I do notice some high pitch sounds from the front left wheel when I am rolling slowly, and a soft rumble, so I am afraid I have a wheel bearing going out. Back into the shop in a few days to fix the bearing, and continue to chase these misfires, and one remaining oil leak (I think it is the main seal leaking again because when we put it in the seal started at an angle and we weren’t able to straiten it, so we used a block and just put it in…seemed to hold for about a week, now leaking again).
I also did the crank seal and thought it was leaking again but it turned out to be leaking a little higher up.
Have a look at my thread here…
https://forums.audirevolution.net/t/oil-leak-new-in-front-of-v10-5-2/18937
I purchased the balancer shaft O-rings (small front one, and larger rear one), and the oil cooler orings, so plan to do all those when I go back in this time.
Now that I have the front suspension links in I warmed up the engine and drove it for a while at 2-3k rpms. It runs pretty well at temp, out on the road, but just a very subtle shake at idle at stop signs. Brought it back home and parked it in the garage and the heat soak test showed the rail pressures rising like they are supposed to, so at least the fuel situation seems to be much better than before…unfortunately, the new HPFPs haven’t completely fixed the misfires, still get an engine light to come on during almost every drive right after it starts.
I did coil/plug swapping earlier in my misfire diagnosis process, to verify that the misfires didn’t follow the parts, but I am starting to wonder if maybe all of the plugs are causing slight misses, and possibly those cylinders are more prone to recording the misfires, is this possible? Does anyone know what the ECM uses to trigger the misfire codes, is it knock sensors or current readings on the plugs/coils? The plugs that are in the car are SKP brand, and don’t have the triple ground electrodes, it only has 1 over the top. Is it possible these plugs aren’t hot enough since they aren’t R rated? I am ordering the NGK 5547 ones just to make sure these aren’t causing problems. May consider coils as well…just want to make sure I have every possible known issue covered before having to take the car to Audi for help in diagnosing these pesky misfire codes!
Thanks, I am back in there, and it does look like the main seal is holding strong! There may have been a little wetness from above the main seal, so I have the balancer shaft Orings changed, and have the oil cooler out to change those, two, as well. The main leakage, though, is coming from the front left (drivers) side. It is really wet below the water pump. Does anyone know if there is a seal on the shaft that drives the water pump, and does this one leak, too?


